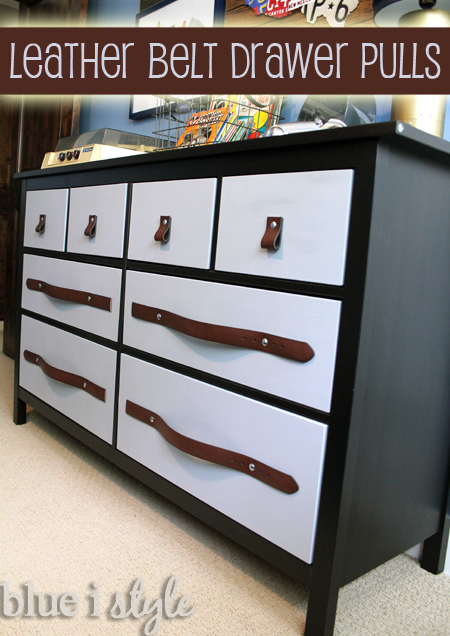
At $1,600, the dresser was out of my price range, and totally impractical for a toddler's room, but I had my eye on the black-brown Hemnes dresser at Ikea and thought it would look great dressed up with some leather drawer pulls. I found a number of leather cabinet hardware options online {like these}, but the price was too high and I thought I could come up with something a bit more unique.
Since I was already planning to tie in some menswear elements into Beckett's room {like the ties on the top of his hanging tent, and the belt shelves}, I decided I could simply pick up a few more inexpensive belts and use them to create drawer pulls. After purchasing the other furniture for the room, I realized that we had a lot of dark wood going into the space, which led me to paint the drawer fronts of the Hemnes dresser a soft grey in order to lighten it up and to provide contrast against the leather belt drawer pulls.
*5 leather belts with no stitching {$6 each at WalMart}
*12 1/4 inch x1 inch Everbilt Carriage Bolts {$9.56/100 at Home Depot}
*12 1/4 inch Everbilt Hex Nuts {$5.98/100 at Home Depot}
*12 1/4 inch Everbilt Lock Washers {$11.67/100 at Home Depot}
 |
| {Obviously, we ended up with a LOT of extra carriage bolts, nuts and washers... any suggestions for other projects using this hardware is welcome!} |
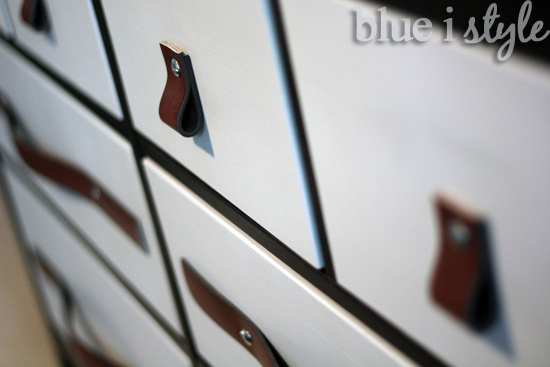
For the four small drawers across the top of the dresser, I decided to create looped drawer pulls that would allow me to utilize the single hole that was predrilled in the center of each drawer {intended for the standard knobs that comes with the dresser}.
I folded over the end of one of the belts to create a loop and held it against one of a small drawer to ensure that the scale was appropriate. Once I determined the size of loop I wanted, I used a piece of chalk to mark the length of belt needed, then measured and marked three more sections of the same length. I used scissors to cut along each chalk line, leaving me with four identical length pieces of leather.
With one hole in the first strip of leather, I then looped the leather over and used a chalk pencil to mark the location of the hole on the other end of the strip and hubby punched the hole. With the holes punched in both ends of the first leather strip, I laid that strip on top of each of the other three leather strips and used it as a template for marking the hole locations.
After creating four leather loops, we were ready to install them on the small drawers. The predrilled holes in the dresser drawers was just slightly too small for the carriage bolts, so Scott used a quarter inch drill bit to enlarge the holes. We then inserted the carriage bolts and secured them on the back of each drawer with a lock washer and a hex bolt.
Here's a look at the completed loop drawer pulls.
The longer dresser drawers had two predrilled holes. We originally thought about using short strips of leather belt to create two separate pulls at each end of the drawers {which would have required drilling two additional holes}. This would have given the dresser a very similar look to the Arhaus inspiration dresser. But then my husband suggested that we might instead want to use only one strip of belt to create a long pull across the center of the drawer {he is full of good ideas!}. I loved this look, and it also meant that we wouldn't need to add any additional holes in the drawers.
The decision to use one long piece of leather, rather than two short ones, on each drawer also meant that we could keep the rounded end of each belt and utilize the existing belt holes to really play up the menswear feel!
Each belt had five belt holes, so we opted to line the center hole up with one of the predrilled holes in the drawer front. My husband held the belt against the drawer while we decided how much we wanted the center of the belt to raise up off of the drawer. Once we were happy with the positioning, I used chalk to mark the approximate placement for punching the hole in the other end of the belt to line up with the other predrilled hole in the dresser drawer. I then folded the belt over on itself, lining the center belt hole up with the mark for the hole on the other end, then drew in a chalk line indicating where to cut the belt {so that the belt would be perfectly centered on the drawer}.
Once I had this first belt cut to length, I laid it out next the other three belts and marked and cut them to the same length. I then folded each of these three belts in half and used a chalk pencil to draw a dot through the third belt hole in order to mark the location for hole punching these belts.
Once again, my husband punched four slightly overlapping holes at each of the marked location so that the carriage bolts would fit through the leather, and then used his drill to enlarge the predrilled holes in the dresser drawers. We installed the long leather drawer the same way we installed the leather loops above, using lock washers and hex bolts to secure them to the back of the drawers.
Here's a close up to give a you a better view of how we used the existing belt holes to install the belts. We wanted the round end of each belt to point to the outter edge of the dresser - so we were careful to pay attention to this when determining which way to install the belts on the drawer fronts.
I am so glad that my husband suggested creating long leather drawer pulls, rather than simply duplicating the looking of the short leather drawer pulls of the Arhaus dresser. It gives the dresser much more of a custom look, and by maintaining the appearance of a man's belt it helps to tie the dresser in with the other menswear inspired elements throughout the room.
It seems that everyone loves a good Ikea hack, so let's take a look at the comparison between the original Ikea Hemnes dresser and my version with the chalk painted drawers and the leather belt pulls.
After completing the leather belt drawer pulls and the belt shelves {shelf tutorial coming soon}, I still had a couple of belts left over, so I even wrapped one around the lamp shade {click here for details on that project}.
I am so happy with how the dresser turned out, and creating the custom leather drawer pulls was much easier than I expected! Now I kinda want to add leather pulls to every cabinet and drawer in the house...


Great job on the dresser! Thanks for the info on how to make the leather pulls...going to try this now.
ReplyDeleteLin, I'd love to see a picture when you are done! Email me a pic, or tag me on Instagram!
DeleteWhat a great idea! Love the masculine touch! Thanks for sharing at The Makers!
ReplyDeleteCorey @ TinySidekick.com
Thanks, Corey!
DeleteThis is such a great project! Your creativity is mind blowing! Love it all!
ReplyDeleteLove this idea! Such a great way to add personality to the dresser!
ReplyDeleteThis is awesome, love this idea {and now I wanna go raid our closet for old belts}! Thanks so much for sharing at The Makers!
ReplyDeleteThanks, Katie! I love The Makers!
DeleteLove this idea! You were featured this week at the DIY'ers! Thanks for linking up with us.
ReplyDeleteThanks, Ashley! What an honor!!
DeleteThis turned out amazing! I love it so much, you're being featured on The DIY'ers this week. http://homecomingmn.blogspot.com/2014/06/the-diyers-6.html
ReplyDeleteThanks so much, Kayla! The other features are awesome, so it's an honor to be included!
DeleteSo awesome! I saw something similar at Pottery Barn on a trunk that was way too expensive. :( I am sending this over to my man right now, so we can plan to hack some furniture for the new house!!!
ReplyDeleteP.S. - I would love it if you linked up at Do Tell Tuesday with the gals and me!
http://www.vintagezest.com/2014/06/do-tell-tuesday-29-and-features.html
Diane @ Vintage Zest
Thanks, Diane! I did link up this as well as a couple of other projects!
DeleteHi AngelaI just wanted to let you know that I LOVE your Leather Belt Drawer Pulls, and I'm featuring you as one of my Rockstars this week from Creativity Unleashed!
ReplyDeleteAs a Rockstar you're in the running for this week's MEGA Rockstar! Grab your friends and come vote at http://www.theboldabode.com/2014/06/creativity-unleashed-rockstars-week-25.html
The MEGA Rockstar gets loads of love including:
1. Shout outs on all my social media houses.
2. A bucket full of Pins to my biggest group boards
3. A big sidebar ad proclaiming them the MEGA Rockstar of the week
4. And a feature in my weekly newsletter!
Congratulations and Good Luck!!!
Wow! Thanks, Gwen!!!!
DeleteAngela- Love this! This is a Friday Favorites Feature on.... Friday! Thanks for liking up! laura
ReplyDeleteThanks, Laura! I can't wait to see all of the other features!
DeleteSO cool--love the makeover! Your instructions are perfect too. Thanks for sharing at Do Tell Tuesday!
ReplyDeleteLove it, love it...but why didn't you go the really cheap (sorry frugal) way and go to your local Goodwill...they always have lots of men's belts that I never know what to do with? Now I do know and can use them for the guest room tall boy! And maybe a great tote handle too. Thanks again...
ReplyDeleteThanks, Lynn. That's a fair question! I actually looked at thrift store belts, but almost all of them had some kind of stitching around the edgeds or down the center, and I was concerned that once I cut the belts to install them on the dresser, the stitching might start to come undone. I looked high and low to find belts with no stitching (it turned out to be harder than I expected). Additionally, at my local Goodwill (where I bought many of the men's ties for the top of the play tent in the same room), most of the belts were around $5, and I only paid $6 per belt at WalMart, so it really wouldn't have been that much of a savings. I do think a chest with mismatched thrifted belts would look great though, and I'd love to see a photo if you end up doing that!!
DeletePerfection!!!
ReplyDeleteHi Angela, I love your custom dresser. I am considering doing something similar for my daughter, but using brass pulls. Can you tell me the distance between the original knob holes so that I can figure out if this is doable with brass pulls? Thanks for the inspiration.
ReplyDelete