TODAY IS THE DAY! The day that I get to reveal Beckett's new big boy room!
I said back in Week 1 that I work best under a deadline, and is that ever true. There is no way that this room would have gotten done in six weeks time if it weren't for all of your encouragement, A LOT of hard work and late nights from my uber supportive husband, and some very special help from my talented mother. If you are interested in the weekly update posts to see how it all got done, you can find those here.
Never have I tackled so many DIY projects in one space, and more than a few times I reviewed my list wondering what I'd have to eliminate, but in the end it ALL got done, and I couldn't be happier. And more importantly, I have one VERY excited toddler who can't wait to sleep in his new room for the first time.
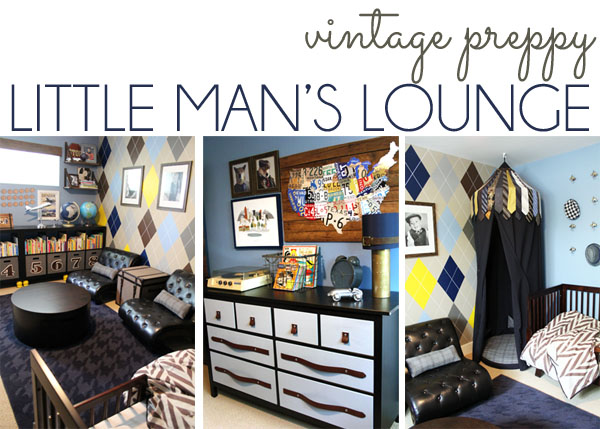
Ok, enough with the chit chat, I know that what you really want are the photos, so without further ado, a menswear inspired Vintage Preppy Little Man's Lounge...
Because it's a kid's room, there's a lot going on, but I'll walk you through it and point out the details... Details which include lots of repurposed menswear, as well as items of special meaning from the men in our family!
Before we go on, let me remind you what this room looked like just over a month ago...
And here's the plan that I created for the space:
Ok, NOW let me show you have the room turned out! Let's start with the view from the door...
And the view from the other side of the room looking back toward the door...
Obviously, the major focal point of the new room is that argyle wall! If you've been following the One Room Challenge, then you've already heard a lot about it, so I'll spare you the details, but the full tutorial with lots of photos of the process can be found
here. Although it was a bit hard for me to cover part of this wall after spending so much time painting it, I am glad I decided to hang photos on the argyle because they help to break up the pattern and keep it from feeling like too much of a good thing. I didn't want the photos to compete with the wall, however, or to make it feel busier, so I chose simple wood frames, wide white mats, and black and white prints of Beckett in his menswear best {in argyle at 6 months, in a necktie at 14 months, and in a bow tie and vest at 2 years old}.

In addition to the argyle, there are lots of other menswear prints throughout the space, including this blue houndstooth rug! I was so thrilled to find this rug because the it adds texture and interest, without a busy color pattern that would feel overwhelming with everything else going on in the room.
The pillows on the chairs were made by my mom and are reversible - one side a grey and brown plaid suit fabric, the other a blue herringbone.
The sheets and comforter both feature brown herringbone patterns, and the comforter, which I purchased on Etsy, is finished with brown corduroy edging and brown buttons.
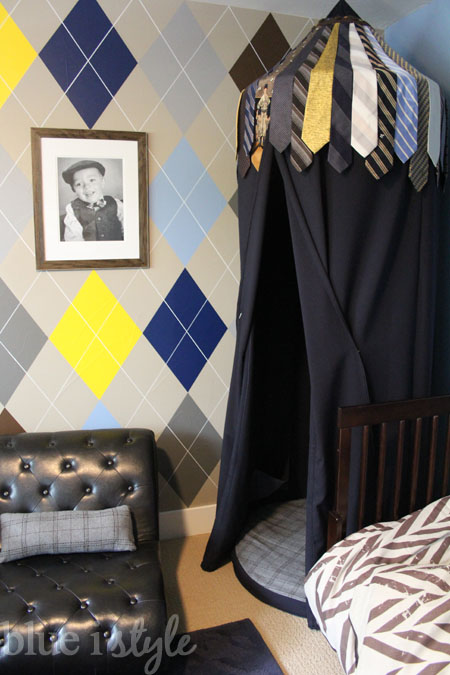
For weeks, I've been hinting at the fact that we were going to be using a lot of neckties in the room decor, and now you can see how. This play tent is one of my favorite part of the room {and definitely Beckett's favorite!}. I've always liked the hanging play tents sold at numerous children's stores, but most have bold patterns that wouldn't have worked well in this space. I asked my mom if she'd be willing to make a tent for Beckett, and I purchased a dark navy suiting fabric with thin white pinstripes. Originally it was going to be as simple as that, but then my mom and I started brainstorming {which always leads to trouble} and we came up with the brilliant idea to use neckties for the top of the tent!
It took us a while to figure out the best way to accomplish this, but in the end, it turned out great! {Tutorial coming soon.} I can't thank my mom enough for all of the hard work she put into this, especially given my crazy deadline! She is AMAZING!
To make this tent even more special, I collected a tie from each man in the family. The tie in the front and center of the tent {the Cubs tie} was the first necktie my husband ever owned.
There are ties included from each of Beckett's uncles, both of his grandpas, and two of his great grandfathers. We added a label to the back of each of these ties so that we'll always know whose is whose. In high school I worked at a restaurant where I was required to wear a tie, so even I have a tie on the tent.
Additionally, a third great grandpa didn't have a tie to donate to the tent, but did give us one of his old tie tacks. All of the remaining ties were purchased from Thrift stores for just a dollar or two each.
My mom made a super comfy cushion for the bottom of the tent, and included three pockets on the inside of the tent where Beckett can stash books or small toys.
Here's the view from inside the tent...
These mini button tufted chairs were actually the jumping off point for the entire room. We spotted them while shopping at Home Goods, but initially didn't give them a second thought because they are actually dog beds {or "Sexy Pet Loungers," to be precise.} But Beckett ran straight to the chairs, plopped himself down, and asked for a book to read. Well, not only was that adorable, it started us rethinking our prior plans for a much more traditional toddler room. My husband suggested we design a "little gentleman's lounge," brainstorming ensued, and, well, you see where we ended up.
And of course a little man with comfy chairs and a love of books needs his own library! I wanted to give him wall to wall shelves to maximize storage space and really create that library feel.
We went with basic Ikea bookshelves but dressed them up with bun feet in a traditional shape. Painting the bun feet yellow adds an unexpected pop and keeps the room feeling like it belongs to a kid.
When I created the mood board for this room, I anticipated purchasing some really cute numbered bins from the Land of Nod, but the dimensions were much too small for the openings of the Expedit bookshelf. Instead, I found some bins at Target that were the perfect size {and color} and I added my own numbers. A tutorial for these numbered bins will be coming soon.
The bins provide tons of toy storage!
Of course, a little gentleman's lounge would not be complete without a coffee table, right? Ok, maybe that's a stretch, but this room design did give me the perfect excuse to by the coffee/play table that I'd been coveting from the Land of Nod!
This table provides play space at just the right height, has no sharp corners, and hides two huge drawers for even more toy storage - one on each side of the table.
And if that weren't enough storage for one little boy's toys {and really, how can you ever have enough storage?!}, I found this fantastic trunk on clearance that serves as a nice little table between the chairs, and the lid lifts up to reveal tons of additional space for toys, blankets... or little brothers! Best of, the hinges hold the lip open, ensuring that no little fingers will get pinched.
On the top of the bookshelves, you'll spot the DIY chalkboard globe that I created a couple of weeks ago, as well as a lighted globe. The globes are paired with a poster of Denver International Airport, where one of Beckett's grandpas works as a computer engineer.
The lighted globe will also serve as Beckett's nightlight.
Now we are getting to another of my favorite parts of the room. Remember my teaser last week about our plans to use belts in the decor of the room? Well, here is the first of four belt projects. How cool are these shelves? Don't worry - I'll be posting a tutorial in the next week or two.
Our next door neighbor's father is an astronaut who autographed a photo for Beckett last year. I found a cute little constellation globe to display next to this memento.
Beckett's great grandfather (my grandpa) was a long-distance Trailways bus driver for many years. I have fond memories of getting to ride on his bus when I was little, and each grandchild in the family was given a toy Trailways bus. Since that time, these buses have become collector's items, and when my boys were born my grandpa gave each of them their very own buses. Since this is such a special item, we are displaying it on the shelf where it can be enjoyed, but not damaged.
Looking down toward the other end of the bookshelves, I framed some of my favorite photos of Beckett.
And, yep, that's a bow tie you spotted! I bought this great desktop calendar that will help Beckett learn about the months and days of the week, but the plain white metal case left something to be desired. To dress it up a bit {pun intended} I added a bow tie, and a shirt button of course.
Our nursery has a fun alphabet poster that Beckett looks at all the time, so I knew that we needed to incorporate the alphabet into his new room somehow, and typewriter keys seemed like a good fit for the space. I printed these, cut them, and strung them on baker's twine.
To keep our library books separate from all of our other books, I picked up a wire basket and used a strip of leather (left over from our dresser project) to create a unique label.
The one project I didn't think was going to get done was the cornice boards - but we managed to get them stained and installed over the weekend. I originally wanted to add a nailhead detail to the cornices, but I am kind of loving how they are right now. I still might change my mind, but with everything else going on in the room, I think simpler might be better here.
The dresser was one of the biggest DIY projects in the room, and I am thrilled with how it turned out. I painted the dresser drawers light grey using chalk paint {tutorial to come}, and then we created custom drawer pulls using inexpensive leather belts {yet another tutorial that will be hitting the blog soon}.
The licence plate map hanging above the dresser is a DIY project {and one that saved me more than $3,700!}. You can read all the details
here.
I was having so much fun incorporating belts into the decor that I decided to add one more around the navy blue lampshade. This was a super simple project, and one that I'll be sharing the details of soon.
To the left of the license plate map is the
Menswear Dog art that I created from a calendar, and below that is an art print of Denver {from
Albie Designs on Etsy} that I just love!!
Since Beckett has such a love of books, I thought it would be fun to to give him my childhood collection of books on record {many of which actually date back to my mom's childhood}.
My dad searched through boxes until he found not only the entire collection of records, but also my Fisher Price record player that I received for Christmas when I was six years old - still in perfect condition. I am so excited to be able share all of these records with my kids.
We even had a family dance party last night to Michael Jackson's "Thriller," which was another gift I received for Christmas in 1986. Michael Jackson and a Cabbage Patch doll...what could be more 80's than that?!
 |
| Me on Christmas, 1986 |
The final detail of the room is the wall of airplane hooks above the bed. Since Beckett loves to wear hats, I had planned to give him a few hooks to hang his hats on to make them part of the decor. When I found these metal airplane hooks, I decided that an entire installation of airplanes would make a great statement, serving both art and function!
The idea of hanging a 20 hooks (each with two screws) while keeping them in even rows and columns seemed daunting, but I came up with a simple method that saved us many potential headaches. I'll share the details of that soon.
I am thrilled with how the room turned out, but none of that matters unless Beckett loves it and feels comfortable in the space. And as you can see from these photos, he's definitely making himself at home!
I always enjoy seeing before and after shots, so I'll leave you with those.
There you have it: 6 weeks, 15 DIY projects, 9 belts, 33 ties, 20 airplane hooks, 1 bow tie, and a very happy 2 year old! I'd call that a One Room Challenge success!
We've also added a few new items to this room that you might be interested in:
LINKS TO ALL OF THE PROJECTS FEATURED IN THIS ROOM:
Labels: bedroom, decor, decorating, DIY, framed photos, globe, home tour, interior design, kids, labels, One Room Challenge