A disorganized home can create unnecessary stress. This is especially true when it comes to your pantry because it's a space you use multiple times a day, every day!
Trying to organize a pantry can feel overwhelming and frustrating because its contents change so frequently. It's easy enough to line things up neatly on the shelves, but the real challenge is creating an organized pantry system that your whole family can keep up with so you won't find yourself rearranging things again and again.
Recently, I got a call from a family that was struggling with their disorganized pantry. I stopped by to see the space for myself. At more than 6 feet wide, with deep, adjustable shelves, this pantry had lots of space for everything... but finding anything on all those shelves was another story altogether.
The family already intended to swap out their frosted glass double doors for solid wood doors, and I helped them create a plan to utilize the space on the back of the doors for additional storage. After relocating all of their spices, as well as many bottles, jars, and even some snacks to the back of the new pantry doors, I was ready to tackle the shelves.
Initially, the family thought they wanted to replace the shelving with a custom pantry system. The quote came back at $5,000 and proposed mostly new adjustable shelves with the addition of a few drawers. A few other optional bells and whistles would have increased the price further.
We determined there was no reason to rip out the existing shelving just to replace it with more shelving, and I assured the family that bins on the shelves could easily provide the same function as built in drawers for a fraction of the cost.
HOW TO ORGANIZE PANTRY SHELVES
In order to best utilize all the shelf space in this pantry, and to create a system that will be easy for the family to maintain, I followed the same five step pantry organizing process that I used in my own pantry:
This post contains some affiliate links. If you purchase something I recommend, you'll pay the same price, but I may receive a small commission.
SHOP THIS ORGANIZED PANTRY
BINS ON SHELVES CAN PROVIDE THE SAME FUNCTION AS DRAWERS
The homeowner really liked the idea of a custom pantry system with some drawers, but since the price was not right, I assured her that we could get the same function by using bins on the existing shelves. In fact, I'd argue that in many ways bins are superior to drawers.
Like drawers, bins make it easy to corral like items, but bins actually more flexible because they aren't height constrained. Some items might be too tall for drawers, but bins allow you to contain taller items because they can sit above the top of the bin.
For this pantry, I used a combination of three different sizes of translucent plastic storage bins with handles, which are really affordable, and can be purchased in cases of 12 at a discounted price.
With custom pantry systems, you typically have to choose between solid drawers or wire basket-style drawers. Solid drawers don't give you a good view of what's inside, and wire basket drawers allow smaller items to fall through. With bins, you can choose a solid or translucent style, depending on the look you prefer, but no matter the style bins are always easy to lift off of the shelves to see all of the contents {ensuring that nothing gets lost and forgotten}.
Honestly, if I could design my own custom pantry, I'd opt for pull out shelves with bins over drawers any day of the week.
TRANSFER FOOD ITEMS FROM BAGS TO STACKING CANISTERS
I just sung the praises of storage bins, but keep in mind that bins aren't right for everything. This family originally had a basket filled with bags of nuts, but many of the bags were torn and even with clips on the bags, nuts were spilling everywhere. I transfer the nuts to appropriately-sized canisters, based on the quantities the family typically buys.
I chose affordable rectangular, stacking canisters that come in three different sizes. These silicone-sealed, airtight canisters will keep the nuts fresh much longer. The ability to stack the canisters is great for space saving, and the family will know at a glance when it's time to restock.
ADD DURABLE, ERASABLE LABELS IN THE PANTRY
Once I had all the bins and canisters filled up, I need to label them. I know this isn’t news to any of you – but I love to label! Labeling is so important, especially in spaces - like the pantry - that are used by more than one person. Labels ensure that everyone can quickly find what they need and that things get put back in the right place.
As important as labels are, it's also important that you keep them both durable and flexibility. The contents of any of these bins or canisters may change over time. Dry erase or chalk maker labels are popular for the flexibility they provide, and I've used them myself many times. But I've discovered their downfall - they wipe off far to easily, leaving you guessing about the contents. I recently discovered an alternative that sounded to good to be true, but after testing them for the past couple of months, I'm in love! Unlike dry erase markers or chalk markers, these permanent marker labels won't smear or wipe away no matter how many times they are handled. These erasable labels from come in numerous sizes and the package includes a permanent marker and a white eraser. When you're ready, you can erase them clean and then write again.
Although these erasable labels come with a marker, they claim to work with any permanent marker. I wanted to test them with a Sharpie, but I was very skeptical that you could evererase a Sharpie. Sure enough, that little eraser is like magic. After the first pass with the eraser you can see a faint shadow of the writing, but after a second pass, the labels look like new and are ready to be written on again and again.
CHALKBOARD LABELS ON PANTRY SHELVES
How fun are these chalkboard labeled shelves?! The homeowner had previously painted the front of the shelves with chalkboard paint, so all I had to do was relabel them correspond with the new organization.
It might seem redundant to have labels on the shelves and on the bins, but doing so will ensure that when the bins are removed from the shelves, they always make it back to the same place. For a busy family, every extra cue will help keep the pantry organized for a long time to come.
HOW TO ORGANIZE ZIPLOC BAGS, WRAPS, AND FOIL ON PANTRY SHELVES
Many Ziploc bag, plastic wrap, and foil boxes are just a bit too tall for standard cabinet drawers, but they can also be hard to store efficiently on a shelf. If you sit just sit the boxes on a shelf, it's not an efficient use of the vertical space, but if you stack them on top of each other, it's hard to get what you need and keep it organized. I came up with a creative, simple solution...
Two small multi-purpose bins turned on their side, and stacked perfectly fit all the boxes of plastic wrap, aluminum foil, and wax paper. Each can be easily pulled out, used, and put back in place without disturbing the others. With the height of the shelf, the homeowners could easily add one more small multi-purpose bins for a third row if needed.
For the taller boxes of bags - including Ziploc storage bags, sandwich bags, and trash bags, I used a medium multi-purpose bin. By placing some inside the bin, and others on top of the bin, I was again able to create two convenient rows of storage on this shelf.
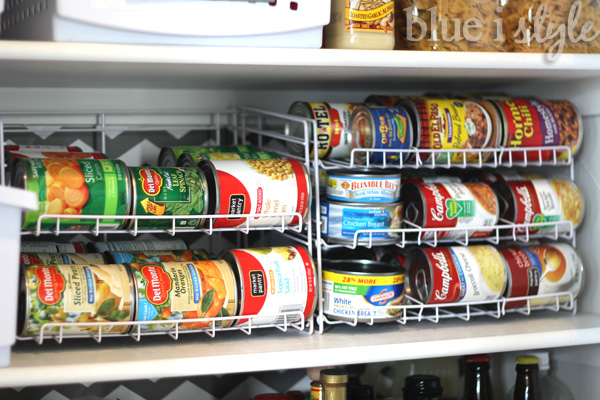
ADJUSTABLE, 3-TIERED SHELVES FOR CANNED FOOD
There are lots of options for organizing canned food, and which solution is right really depends on the quantities you keep in your pantry. Since we have a fairly small pantry, gravity-feed can racks work great for my family.
These gravity-feed racks work well when you tend to purchase multiple cans of each type of food, so that you can store the extras behind the front can. My clients, on the other hand, had a much wider variety of canned food, so gravity-feed racks would have made it hard for them to see everything. Additionally, my client had numerous cans with larger diameters that wouldn't have fit well on gravity-feed racks.
Instead, I selected two expanding, three-tiered shelves to organize all of the canned goods. In addition to the three plastic tiers, the shelf surface creates a fourth tier for even more storage. Raising the cans up makes it easier to see each can and find things at the back.
These shelves expand from 13"-25", allowing two units to fill the full width of my client's wide shelves. Each tier is deep enough to accommodates larger cans and jars.
USE DIVIDED TURNTABLES
I've been singing the praises of divided turntables a lot lately, especially after using them to organize under my bathroom sink. It turns out they are also perfect for the pantry. The 4.5" high sides on these turntables are tall enough to keep things neatly contained, but perfectly in view.
The options of what you can organize in these divided turntables are endless, but in this pantry, I used them to organized different varieties of granola / health bars, as well as tubes of drink mixes.
SPICE RACKS CAN DOUBLE AS SNACK STORAGE
The new spice racks on the inside of the wood French doors provide tons of extra storage. I designed the the back-of-door shelves in various depths to accommodate a wide range of spices and condiments. It turns out that these back of door spice racks are also ideal for storing grab-and-go items for quick lunch packing and after school snacking.
When I first tried putting some of these items in the spice racks, they slid right through. I discovered some clear "deep drawer bins" that fit perfectly in this rack, and keep the snack contents neatly in place.
PANTRY FILE BOX FOR APPLIANCE INSTRUCTIONS
Finally, as I was organizing this pantry, I came across lots of instruction manuals and a few recipe clippings here and there on the shelves. I collected them together in a simple multi-purpose bin.
The finished, organized pantry sure is prettier than when I started. But more importantly, all of these pantry organizing hacks helped me create an organizing system that will make this space easy to maintain and keep organized!