Our garage used to be my dirty little secret. I would go out of my way to not let friends of family ever sneak a peek in there because it was so bad. SO bad. Like "no room to park two cars in a three car garage" bad!
Last fall we finally reclaimed our garage and I shared lots of pictures with you when we finished. Since then, I've gotten quite a few comments suggesting that the photos looked good because it was just a "staged" version of our garage, and that it wouldn't look that way once we started really using it with all of our stuff.
But almost a year later, I'm proud to say that our garage still looks almost exactly the same. And that is for one reason, and one reason only...
...because when I took those pretty garage photos, all of our stuff was already in there. We simply found creative ways to give everything a dedicated space, which not only makes the garage look nice, but more importantly, it makes it easy to keep it organized.
So today I want to show you how we did it by giving you a much more detailed tour of all the solutions we employed to make the garage an organized space with room for everything, and that's easy to maintain.
But, of course, we need to start at the beginning. The scary, overwhelming beginning.
THE ULTIMATE CHALLENGE
The garage needs to be the hardest working space in the whole house. We need ours to serve as a workshop for our DIY projects, hold all of our outdoor tools and toys {as well as our outdoor cushions and decor during the off-season}, bikes and sporting equipment, holiday decor, and so much more.
We are lucky to have a finished basement that adds a lot of living space to our house, but that means almost no extra storage space. As a result, the garage also becomes a catch all space everything else that we have no room for inside the house.
That's a tall order! And until last year, our garage was not up to the task. This was the "cleaned up" version after we cleared out tons of no longer needed items last fall...
You can see that we'd made an effort to organize the space once upon a time. But a wall full of shelving units and all the plastic totes in the world weren't going to make this space functional because it didn't give us room for all of the other "stuff" we needed to store. And as long as the bikes, wagons, strollers, tools, and trash cans were piled in front of the shelves, getting to the semi-organized stuff on the shelves was an impossibility.
WHERE TO BEGIN? MAKE A LIST
We came to the realization that we needed to start from scratch with a whole new organizational plan. Once we had cleared out everything that we no longer wanted or needed {donations, recycling, and trash - in that order}.
Then I made a list of everything that remained, and also made a pass through the house adding to the list anything else that I wanted to relocate to the garage. Then I got really bold, and added to the list some of our big wish list items, like an extra fridge, freezer, and rolling workbench. I figured it I was starting over, this was the time to try to find a space for those items.
DIVIDE & CONQUER
Once I had a fairly comprehensive list, I started dividing the list into categories. I then measured the garage and started to sketch out a plan that would address each category on my list.
I designated a zone for each type of item that we needed to store in the garage, and then began brainstorming the best ways to address each need. Here's the final version of the plan I came up with {although a few things still changed once we started to implement the plan}:
By breaking it down section by section, and category by category, it was a lot easier to brainstorm creative solutions.
The ultimate key to my plans came down to the organizing mantra I come back to time and again - use every available space! That includes the walls, floor, and ceiling, and a few more spots you might be overlooking. Let's break it down space by space...
*This post contains some affiliate links. If you purchase something I recommend you'll pay the same price, but I may receive a small commission, which helps me keep this blog running.
DITCH THE SHELF UNITS & CLEAR THE FLOOR
The number one key to our success in our garage was ditching the shelf units that I bought when I first moved in. They originally seemed like a great solution, but over time their flaws became obvious. They didn't allow us to take full advantage of the height of the garage, we ended up stacking all of the larger items in front of them.
I realized that no amount of organization was going to make our garage work for us until we could figure out a way to keep the floor space clear so that we weren't climbing over bikes, trikes, wagons, and coolers in order to get to everything else.
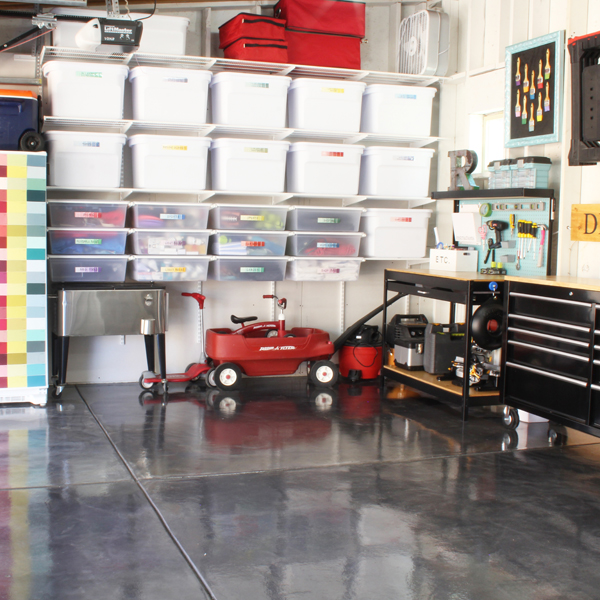
The solution was to install a system of shelves and drawers on the garage wall, with enough open space below to tuck most of our larger items underneath. {Side Note: Notice that shiny, pretty metallic floor?! You can read more about that here.}
Over the years, I've found that bins are great for items that we use occasionally, but they become a pain to put up and down for more frequently used items. Choosing matching white plastic totes for the shelves helps keep the garage looking fresh and clean.
That's why I love the drawers so, so much! They provide us much easier, eye-level access to many of the things that we use on a regular basis. Rather than the standard ventilated drawers, I opted for the translucent plastic drawers with snap on lids that keep everything inside clean and free from dust and bugs.
Regardless of whether drawers are the right option for your needs, definitely opt for adjustable hanging shelves that allow you to clear the floor space and adjust the spacing between the shelves as your future needs change.
So what did we put in all the bins and drawers?
UPPER SHELF BINS: Holiday and seasonal decor that's only accessed a couple of times a year
DRAWERS: Reusable shopping bags; BBQ tools; Picnic backpack & blanket; Gardening gloves & tools; Extra trash bags; Car wash tools & towels; Ropes & cords; Shop rags; Extra light bulbs; Small balls and sporting equipment
I added simple paint chip labels to the front of each bin and drawer to make it easy for everyone to find what they need, and to add a fun touch of color. Paint Chip Label Tutorial
Moving everything up onto the walls to clear the floor space provided room for us to tuck a lot of the bulky and heavy stuff underneath, including our rolling beverage cooler, wagon, trike, scooter, shop vac and air compressor.
Hanging the shelves and drawers on the wall also allowed us to take full advantage of the height of the garage, which allowed us to free up additional wall space for the extra fridge and freezer that we had been wanting and needing.
The white fridge and freezer were calling out for something fun, so I covered them both in more paint chips. The tutorial for that is coming soon!
OUT OF REACH OF LITTLE HANDS
We were able to take advantage of the space on top of the fridge and freezer for additional storage, including for our cooler and beverage tubs. We also used this space for all of the liquids that need to be kept out of reach of little hands, like weed and bug sprays, antifreeze, windshield wiper fluid, and cleaners.
I used large open front storage bins {similar to these} to contain all of the bottles, and to ensure that any leaks would be contained.
YARD TOOLS
We use to have a rolling tool organizer {like this one}, and it worked well when it was in the corner of our garage with high ceilings, but when we tried relocating it next to the fridge, the garage door creates a lower "ceiling" and it was to hard to shovels and brooms with long handles in and and out of the rolling cart.
We decided to instead use the open wall space to hang our yard tools, and we installed a broom and rake tool hanger with adjustable clamps that can hold handles of various diameters. We wanted to keep the clippers up high, out of reach of the kids, so we installed three garage wall hooks to keep them securely in place above the other tools.
Hanging the tools freed up the floor space for our frequently used items, like our bucket and watering can.
Trash cans always pose a storage challenge in the garage because they take up so much space. We live in a neighborhood with an alley rather than a driveway, so when we had our new backyard fence built a couple of years ago, we included a small, gated enclosure against the fence to hold our three large, city issued bins for trash, recycling, and composting.
Moving these three large bins out of the garage and out of site, while still keeping them out of sight has been a major game changer for us.
If you're looking for a similar solution for hiding trash cans, take a look at these options:
WORKBENCH & TOOLS
In the front corner of the garage, we finally have a dedicated workshop space that provides enough storage for all of our tools and makes it easy to work on projects.
I wanted a nice, stationary workbench, but since we splurged on the wall shelving/drawer installation, I opted for a very inexpensive but functional workbench, and then made it look nicer with a few easy DIYs. We swapped out the particle board top and lower shelf on this workbench for birch plywood sheets from Home Depot {$20 each}, which I stained with Rust-Oleum Summer Oak and added two coats of polyurethane for a higher end look. I also painted the peg board using Sea Mist Pearl Metallic spray paint.
But let's focus on the function...
Large Tools. One of our biggest challenges was finding storage space for our miter saw without filling up our work surface. That's where this workbench is a big winner for us. That large shelf on the bottom is perfect for our saw, as well as our large toolbox, and more.
Extension Cords. Because the workbench frame is metal, we were able to use two more heavy duty magnetic hooks to hold extension cord roller cases. These keeps our extension cords close at hand without taking up valuable shelf space.
Pegboard. The pegboard is a great solution for basic tools that we use frequently. Having these tools on display makes it easy to grab and go when I'm working on a project in the house and need to hang a few pictures or assemble a piece of furniture.
In addition to using hooks to hang tools, I added a couple of pegboard part bins for my measuring tape and allen wrenches.
Instruction Manuals. I've always kept all of our instructional manuals together in the house, but I realized that it would be much easier to keep the manuals in the garage for our tools, air compressor, and the like. I hung a white file holder on the pegboard to keep all of our garage-related manuals in the same place.
Nails & Screws. I wanted to organize our nails, screws and other small parts and pieces in a way that I could easily carry them in the house for hanging photos and other small household projects. I used to teal craft boxes to sort and store them. If you want more details on how I organized everything in these boxes, including how I added labels to keep track of sizes, watch this quick video I made.
Rolling Workbench. While I love stationary workbench provides a lot of storage and function, there are times when we need more elbow room to work - especially when using our saw to cut large pieces of wood. To address this need, I purchased a rolling workbench with an adjustable height top. I love that that it can be moved out into the middle or the garage for projects. And, of course, the then drawers of varying depths are perfect for storing all of our other tools.
That "DIY with Style" wood sign was a quick and easy project, and it does a great job of hiding a bunch of electric wires that run through the studs right behind the sign.
HANGING FROM THE WALLS
We still had quite a few big items that needed to be stored for easy access, so we again looked to the walls. Our fold-flat sawhorse worktables hang on the wall above the rolling workbench using two extra deep ladder hooks.
Because these worktables are very lightweight, it's easy to lift them up and down when we need them for a project.
We also hung our step ladder and our full height ladder from the garage walls as well. The step ladder hangs from a jumbo ladder hook.
We tried hanging our tall ladder using the same kind of hook, but it didn't hold it flush enough to the wall. Instead, we ended up using a multi-use storage bracket.
Originally we had planned to hang our bikes the opposite direction with some simple ceiling hooks, but then realized that they our SUVs were too tall to park under the bikes in that position. Instead, we ended up hanging them parallel to the front wall of the garage using a bike pulley system - and I'm so glad we did!
I had been concerned about my ability to lift my bike down form the ceiling, and thanks to the pulley system, I don't have to! Instead, I simply have to unwind the excess rope, pull to release the locking mechanism, and lower my bike.
The wall hooks that we wind the excess rope around also provide a perfect spot to hang our bike helmets.
OUTDOOR CUSHION & COVER STORAGE
Last, but not least, we needed to find way to store all of our outdoor cushions, pillows, and accessories during the snowy winter months, and where store our bulky furniture covers during the summer months. I knew a deck storage box would be the ideal solution, but we didn't have a good place for one in our small backyard.
We park two cars in our three car garage, and I was thrilled when the measurements revealed that we had just enough depth for a large deck storage box in front of one of the parking spaces {below the bikes}.
We were left with just a small bit of extra space next to the deck box that turned out to be the perfect spot to tuck away our folding banquet tables that we deemed too heavy to hang on the wall, as well as our jawhorse portable work station.
Phew... that was long! Let's review. Here's a quick summary of my best garage organization tips:
WHERE TO START: Make a list. Divide and conquer.
DITCH THE SHELF UNITS & CLEAR THE FLOOR. Opt for adjustable wall shelves and drawers with space below for larger items. This provides the flexibility to adjust as your storage needs change.
OUT OF REACH OF LITTLE HANDS. Create a space up high for potentially dangerous / toxic items.
YARD TOOLS. Make the most of vertical space using wall hooks and heavy duty magnets.
TRASH & RECYCLING. Create an outdoor enclosure to keep these out of the garage.
WORKBENCH & TOOLS. Allow space for large tools without taking up your work surface; use pegboard for your most frequently used tools; dedicate a space for instruction manuals; use small divided bins to organize nails and screws; a rolling workbench provides a flexible work space.
UTILIZE WALL & CEILING SPACE. Use a variety of hooks to hang yard tools, sawhorses, ladders, and bikes. Pulley systems makes it easy to hang bikes from the ceiling without the weight of lifting them down.
OUTDOOR CUSHION & COVER STORAGE. Create a dedicate space to store outdoor cushions/pillows during the winter, and to store furniture covers during the summer.
I'll leave you with a last look at how all of the full organized garage, for perspective on how each of these organized zones fit together.
SHOP GARAGE ORGANIZATION
Be sure to pin the image below so you can find your way back to these organizing tips when you are ready to tackle your own garage!
Want more details on some of the other projects in the garage? Use the links below, and feel free to leave me a comment if you have a question that I haven't answered.