When you have two boys less than two years apart in age, they are bound to have similar interests, and in our house that currently equals TRAINS!
When Beckett turned three a few months ago, he requested a Thomas the Train cake and I happily obliged. Then last week when I asked Cooper what kind of a cake he wanted for his second birthday, I wasn't surprised at all to hear the same answer - a train! But I didn't want to simply make him a duplicate of Beckett's cake, so I came up with a fun cupcake train alternative.
Both cakes were super simple {the only kind of cake decorating in my skill set} - so both of these train cake tutorials fall in the "if I can do it, you can definitely do it" category!
THOMAS THE TRAIN NUMBER 3 CAKE
Supply List
- Number 3 Cake Tin {from Amazon}
- Crisco shortening
- Flour
- 2 boxed cake mixes
- 2 cans white cake frosting
- Green food coloring
- Icing knife
- Black Gel Icing
- Handi-Snacks Oreo Cookie Sticks
- Thomas the Train toy
- Candles
Baking a Number Three Shaped Cake
It is possible to make a cake shaped like any number using standard round and square cake pans, but I like to do things the easy way, so I opted to buy a cake tin shaped like the number 3. I debated on whether the pan was worth the $20 price tag for this specialty pan, but I since I'll have another kiddo turning three next year, I decided that I was ok with getting two uses out of the pan and then selling it. If you instead prefer to DIY your number cake, here are
simple instructions.
Prepare the pan by using a paper towel to grease it with a light coating of Crisco shortening, then dust the pan with flour for extra assurance against the cake sticking to the pan. Crisco shortening is preferable over alternative methods {like cooking sprays} because it does not burn and imparts no taste.
With the pan prepared, we mixed up two boxes of cake mix, and poured about 3/4 of the batter into the pan {we made cupcakes with the extra batter}. Before baking the cake, remove air bubbles from the batter in the cake pan by picking up the pan and drop it squarely onto the counter top several times from a distance of a few inches. You will see small bubbles rise to the top of the batter and pop. Continue dropping the pan until you see no more bubbles rising to the surface.
After the cake bakes, let it cool for a few minutes before removing it from the pan. As our cake cooled, the center dropped just a bit, but this wasn't a problem since I was going to frost the smooth "bottom" side of the cake.
To easily remove the cake from the pan without breaking the number three, we placed a cooling rack on top of the pan, and then inverted it to release the cake onto the cooling rack, slowly lifting the cake pan off. This left the smooth side of the cake up and ready for frosting.
Frosting the Cake
Next, I was ready to frost the cake. I combined to cans of cake frosting in a bowl and mixed in several drops of green food coloring at a time until I achieved a soft grassy green color that I was happy with.
I separated about 1/3 of the frosting into a small, separate bowl and began applying a thin layer of frosting to the cake. This initial thin layer is often referred to as a "crumb coat" or "crumb frosting" because it is a way to seal in the cake's crumbs so they won't get into the final coat of frosting. I learned this technique from my mom, who used to be a professional cake decorator and it's a really simple tip that helps make your cake look much nicer when finished!
By separating some frosting into a separate bowl for your crumb coating, you ensure that any crumbs that end up on your knife as you work on this first layer will not end up in the larger bowl of frosting that will make up your final, top coat. I should have been using a frosting knife, but since we were up in the mountains I made due with a butter knife and a flat spatula.
Once the crumb coating was complete, I used the larger bowl of frosting to give the cake a nice, smooth final coat of frosting.
Adding Train Tracks to the Cake
With the cake frosted, I was ready to begin adding the train tracks. I began by drawing the tracks on with black gel frosting, tracing about a quarter of an inch inside the inner and outer edge of the three.
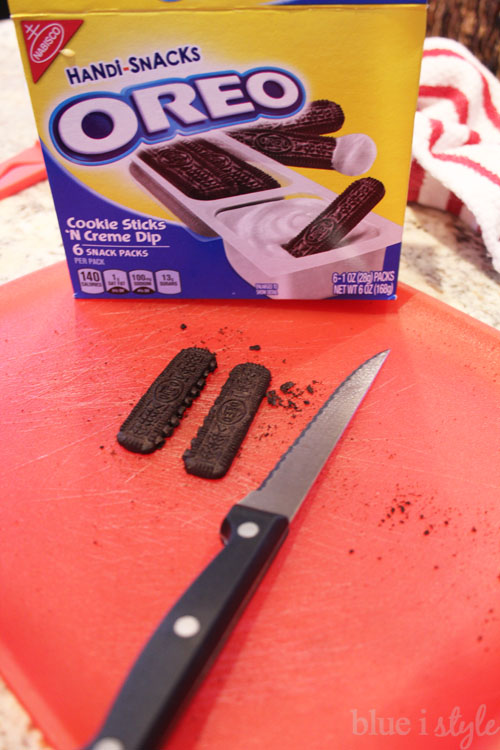
Then I was ready to add the railroad ties to complete the look of the train tracks. As I shopped at the grocery store, I considered a number of different items to use as the railroad ties, including pretzel sticks and KitKats, but when I found the Handi-Snacks Oreo Cookie Sticks, I knew they would be perfect because they were nice and wide, but also quite flat.
The Oreo Cookie Sticks come attached together in sets of two. We initially tried to separate them by hand, but they ended up breaking unevenly. Instead, we used a sharp knife to cut them apart, applying gentle pressure, and we were then able to cut each set apart with no breakage.
I carefully placed the Oreo Cookie Sticks across the railroad track, eyeballing their placement to make them approximately evenly spaced.
Finally, I added a small Thomas the Train toy {this one was a brand new bath tub toy from
Amazon that we hadn't yet used in the tub).
We added three candles and called the cake done!
This Thomas the Train birthday cake could not have been easier to make!
And the birthday boy was pretty pleased that mommy delivered on his request for a Thomas the Train third birthday cake!
So that was five months ago. Fast forward to this past weekend when we celebrated Cooper's second birthday. He also wanted a train cake, but I didn't want to simply make a duplicate of big brother's cake, so instead I made him cupcakes and turned them into a train.
CHOO CHOO CUPCAKE TRAIN
Supply List
- Boxed Cupcake Mix
- Cupcake Papers
- 2 Cans White Cupcake Frosting {aerosol can with frosting tips}
- Frosting Color Mist {Wilton brand from Michaels}
- Sprinkles {optional}
- 1 Bag Mini York Peppermint Patties
- Toothpicks {1 per cupcake}
- Toy Train and Tracks {I used Fisher Price GeoTracks}
- Green Poster Board
- Candles
Baking Cupcakes
This first step really requires no instruction. Simply bake cupcakes in your choice of flavors and colored papers. I baked two dozen cupcakes in red papers, but only used half for this cake {the other half I froze for later}.
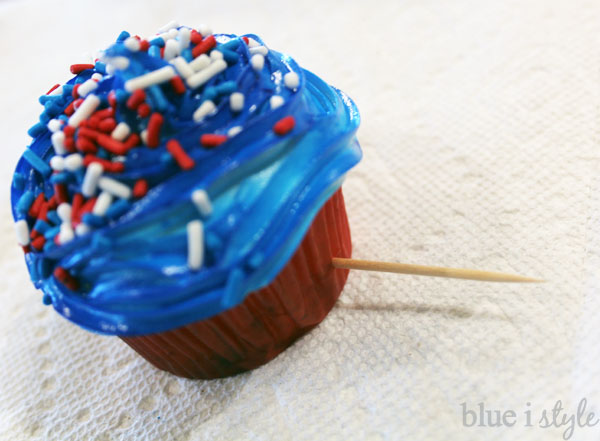
I wanted true blue frosting, so rather than using food coloring to try to get to a dark enough shade of blue, I instead opted to try out a can of frosting color mist for the first time. I first frosted the cupcakes in white icing, then used the can of spray mist to spray the top of the cupcakes. After several passes with the spray, I was able to easily achieve a nice, dark blue. Then I added some red, white and blue sprinkles to the top of each cupcake.
Turning Cupcakes in to Train Cars
I looked at several tutorials on Pinterest that involved fairly complicated processes for building train cars with wheels that the cupcakes could sit atop of. I prefer to keep things simple, so I decided to simply add wheels to the cupcakes themselves so they could sit directly on the train track. I searched the candy aisle of the grocery store for something small and round that would be soft enough to stick a toothpick into {so mini Oreos were out}. Finally I found the perfect solution - York Minis.
Adding the wheels to the cupcakes was as easy as sticking a regular length toothpick through the bottom of each cupcake, and then pressing a York Peppermint Patty onto each protruding end of the toothpick.
Assembling the Cupcake Train
With the wheels added to each cupcake, all that was left to do was assemble Cooper's toy train tracks and place the cupcakes on the track and added candles to the cupcakes to spell out "HAPPY 2 BDAY."
I added a train engine at the front...
...and a caboose at the back to complete the cupcake train.
The York Mini "wheels" are positioned such that they really look like wheels running on the train tracks.
If I had it to do over again, I would have gone to another store in search of the lined cupcake papers that stay true to color, because the thin red papers I used ended up looking a bit too dark {not to mention splotchy because of the funfetti cake mix}.
But overall, I think the cupcake train turned out really cute!
And Cooper was thrilled, which is all that really mattered to me!
Now if the boys request train cakes again next year, I'm going to have to get REALLY creative! :)

Let's get social!
Labels: birthday, birthday party, cake decorating, cupcakes, entertaining, kids