Sometimes projects don't turn out as well as you envision them in your head, but then every once in a while a project turns out even better than you pictured it - and man is that exciting! That was the case with the wood letter photo displays I created for Mother's Day.
The best part of this project is that it can be so easily personalized, and it's also fun and easy to get the kids involved!
To create a very special gift for my boys' Nana, I let them paint the letters themselves, and then I created a second set of letters for myself. Only a blogger makes something for them self for Mother's Day, right?! LOL! #bloggerproblems But I really do love them!
UPDATE: I created a video tutorial for this project that you can watch by pressing the play button in window below, or continue scrolling down for the complete picture tutorial for these photo displays!
MOTHER'S DAY LETTER PHOTO HOLDERS
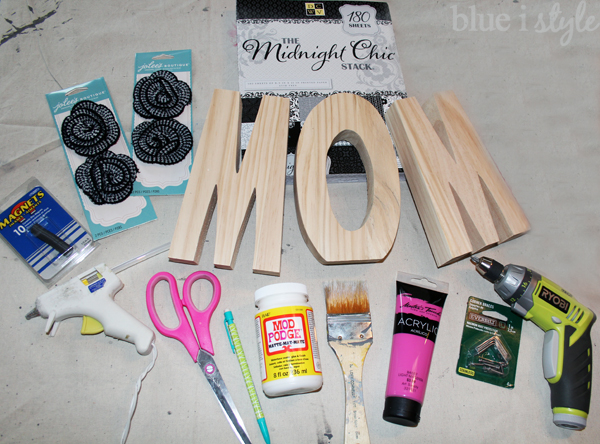
Supply List:
This post contains affiliate links. If you buy something that I recommend, you pay the same price, but I may receive a small commission.
- Chunky Wood Letters (JoAnn Fabric & Crafts $4.99/each on sale)
- Scrapbook Paper (1 - 8.5"x11" piece of paper per letter)
- Flowers (1 per letter; JoAnn Fabric & Crafts $2.99/2 on sale)
- 3/4" Zinc Plated Corner Braces with Screws (1 per letter; Home Depot $1.97/4)
- Ceramic Disc Magnets (1 per letter; Home Depot $2.59/10)
- Pencil
- Scissors
- Acrylic Paint & Paintbrush
- Mod Podge (matte)
- Hot Glue Gun
- Electric Screwdriver (Ryobi from Home Depot)
STEP 1: PAINTING & MOD PODGING LETTERS
Begin by selecting patterned scrapbook papers (I picked a different pattern for each letter). Trace the front and back of each letter on to the back of a piece of scrapbook paper. Be sure to label the tracings to indicate which is for the front of the letter and which is for the back, then cut out the letters.
Next, paint the edges of the letter using acrylic paint in the color of your choice.
After the paint is dry, apply a layer of Mod Podge to the each letter and apply the scrapbook paper {the mod podge serves as glue}.
Once the paper is affixed to each letter, apply a coat of Mod Podge over the entire letter - covering the scrapbook paper as well as the painted edges. This seals and protects that paper, making the letters much more durable. I used matte Mod Podge, but you could choose a glossier finish if you prefer that look.
The Mod Podge looks white and cloudy until it dries, so don't be alarmed at this appearance as you work - it will dry totally clear.
STEP 2: ATTACH CORNER BRACES
In order to turn the letters into a photo display, add a metal corner brace to the top of each letter, and use a small magnet to a photo to each brace. Just be sure to use zinc-plated corner braces because stainless steel braces are not magnetic. {Yes, I did learn this lesson the hard way by not reading the package close enough the first time around.}
Once the Mod Podge is dry, screw one corner brace to the top of each letter. Make sure that the vertical leg of each brace is flush with the front of the letter.
After attaching the braces to the letters, I felt like the silver stood out too much, so I quickly applied a coat of matching pink acrylic paint to each corner brace.
STEP 3: CREATE DECORATIVE MAGNETS
To dress up the black ceramic disc magnets, I picked up some adorable crochet flowers from
JoAnn. I used hot glue to a magnet to the back of three flowers. You can, of course, choose anything you want to decorate your magnets.
STEP 4: PRINT & DISPLAY PHOTOS
Finally, I printed three of my favorite photos - one of me with each of my boys, and one family photo. I cropped each photo to a 5" x 5" square {because I love the modern look of square photos} and I converted them to black and white to coordinate with the patterned scrapbook paper I chose.

I simply placed the photos in front of the corner braces and then used the flower magnets to hold the photos in place.
Like I said, I was excited about this project right from the start - but the finished product exceeded my expectations. I love these photo display letters so much that I may just leave them out year round!
And look how great they look on the coffee table in our living room!
Ok, so now that you've seen the set of letters I created to perfectly fit my own taste, let me show you an easy variation that gets the kids involved in making a very special gift for grandma!
MOTHER'S DAY LETTER PHOTO HOLDERS:
GET THE KIDS INVOLVED
Supply List:
- Chunky Wood Letters (JoAnn Fabric & Crafts $4.99/each on sale)
- Wood Hearts (1 per letter; JoAnn Fabric & Crafts $2.49/7)
- 3/4" Zinc Plated Corner Braces with Screws (1 per letter; Home Depot $1.97/4)
- Ceramic Disc Magnets (1 per letter; Home Depot $2.59/10)
- Acrylic Paints & Paintbrushes
- Chalkboard Paint
- Hot Glue Gun
- Electric Screwdriver (Ryobi from Home Depot)
STEP 1: PAINTING THE LETTERS
I began by giving each letter a quick coat of white acrylic paint.
Then I turned the painting over to the boys. Beckett painted the As, and Cooper the Ns. I let them pick their own colors and they had so much fun!
Cooper may have painted just as much on himself as he did on the letters. I absolutely love this photo of his precious little hands!
STEP 2: ATTACH CORNER BRACES
As I mentioned above, be sure to buy zinc plated corner braces {not stainless steel, which are not magnetic}. Screw one corner brace to the top of each letter.
STEP 3: CREATE DECORATIVE MAGNETS
My boys' Nana currently has three grandsons, but there's a very good chance she'll have more grandchildren over the years. Instead of creating flower magnets like I made for my photo display, I thought it would be more fun if she had little chalkboard labels that she could customize and update over time with the names of her grandchildren. I picked up a bag of thin wood craft hearts, and painted them using black chalkboard paint {which I had left over from prior projects}.
Before writing on the chalkboard hearts for the first time, I primed the paint by using the side of piece of chalk to fully cover the painted surface. Then I rubbed the chalk in with a dry cloth before using a damp paper towel to remove the chalk.
After priming the chalkboard paint on one side of each heart, I turned the hearts over and used hot glue to affix a magnet to each.
I then wrote the names of the grandsons on the chalkboard hearts.
STEP 4: PRINT & DISPLAY PHOTOS
I printed a 5" x 5" square photo of Nana with each of her grandsons, and one of all of them together.
My boys can't wait to show their Nana what they made for her for Mother's Day {if she doesn't see it here first}. I just know she is going to love it, and over time she'll be able to update the photos and the names the chalkboard hearts as her brood grows.
Each set of letters {MOM and NANA} took less than an hour to create - so if you're looking for a stylish and meaningful Mother's Day gift for a mom in your life, pick up some letters, corner braces, and magnets ... and then get creative!

Labels: chalkboard, craft, crafts, gift, Mother's Day, photos