This post is sponsored by Target and American Crafts, but all opinions are my own. Read my full disclosure.
My boys LOVED the Countdown to Santa calendar that I drew on our chalkboard wall for Christmas, so I knew I wanted to create a fun Valentine's Day "advent" calendar for February. When Target offered to send me a box of Valentine's themed American Crafts craft supplies from their One Spot, I jumped at the chance. As soon as the box arrived on my doorstep I ripped it open and was thrilled to find that it contained the perfect items to create a fun and stylish Valentine's countdown banner!
You've all heard me say a million times that Target is my happy place, and the One Spot is the cherry on top. I've always made it my first stop on my way into the store, but recently the goodies I've been finding there just keep getting better! Seriously, have you seen the adorable wrapping paper and gift tags they've had lately?
For Valentine's Day, the One Spot is stocked with over 40 amazing craft products, ranging from washi tape and stickers, to kraft and chalkboard basics, and even the ever popular striped straws - all for between $1-3! Here's just a glimpse at some of the One Spot Valentine products I received in the mail a few days ago...

I immediately started sorting through all the goodies I received looking for the items that would be perfect to create my Valentine's countdown calendar, and I settled on two packages and white and kraft treat bags, some cute pennant banners, and a roll of red and white washi tape to start with.
After testing out several different metallic pen and marker options to see what would show up on the black pennants, I discovered that the gold Sharpie paint marker, which I had left over from my chalkboard globe project, worked perfectly.
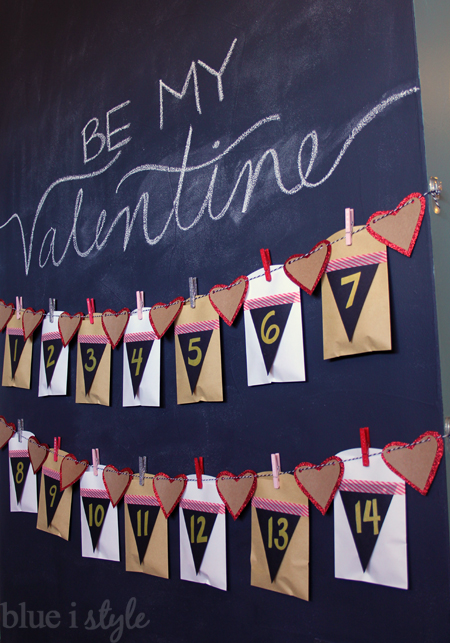
I wrote the numbers 1 through 14 on the pennants, keeping the plastic packaging under each as I wrote to prevent any paint marker bleed through onto my table top.
I then used the washi tape to affix a numbered pennant to the front of each treat bag, alternating between the white and kraft paper bags.
I wanted to find a way to also use the kraft paper pennants, and to take advantage of the pre-punched holes in the top of each, so I sketched out a heart on one - redrawing it several times until I was happy with the shape. I then cut it out and used it as a template to trace and cut 15 more kraft hearts.
Next, I traced one of the kraft hearts on the white cardboard backing from a package of red glitter paper. After tracing the heart, I drew a larger heart around it and cut it out along the outter line {creating a heart template a bit larger than the kraft paper heart}. I then used the template to trace and cut 16 red glitter hearts.
I then used a glue stick to glue the bottom 2/3 of each craft paper heart to the red glitter hearts, leaving the top portion of each craft heart unattached {allowing me access to the holes for stringing up my banner}.
With the treat bags and hearts assembled, I was ready to start hanging my countdown banner.
I decided to hang the banner in two rows in front of our
kitchen chalkboard wall, using the black and white bakers twine that came in the pennant banner packages. I stuck some clear 3M Command strips and hooks to the left side of the wall, and tied one end of each piece of twine to the hooks. I strung the bakers twine through the holes in the kraft paper hearts {8 hearts on each row}, then tied the twine to clear hooks on the right side of the wall.
Now it was time to fill the treat bags before hanging them on the banner. Rather than simply filling the bags with candy, I wanted to use this countdown banner to tell our boys all the reasons that we love them - from the things that make us proud of them to simply how dang cute they are! I cut 6" by 4" inch strips of the red glitter paper {28 total strips - enough for one note per boy in the 14 treat bags}. I used three cute stamps to decorate the white side of each strip of paper, and then my husband and I wrote out the notes to the boys.
Since our boys are quite young, I don't want them to have too much candy, but I did place one chocolate heart for each boy in each bag.
Once the bags were filled with the notes and chocolate hearts, I used four packages of glittery clothespins to clip the bags to the bakers twine in between each of the hearts.
I wrote "Be My Valentine" on the chalkboard wall above the banner to complete the display.
I just love the contrast of the white and kraft treat bags against the black chalkboard, and the red glitter hearts and glittery clothespins add just the right amount of bling for mom, without making it too girly for my boys!
I'm afraid that it's going to drive my boys a bit crazy to see the countdown banner hanging on the wall for another week and a half before they can begin taking the treat bags down on February 1st, but I wanted to share this cute project with you as soon as possible because all of these fabulous One Spot Valentine's craft supplies will only be available for a limited time, and will likely sell out quickly!
I still have a handful of cute One Spot craft products that I didn't use for my countdown banner, but you can bet they'll be popping up soon in other projects I have planned!
Labels: calendar, chalkboard, crafts, kids, seasonal, sponsored, Valentine, Valentine's Day, washi tape