I am really enjoying working on some DIY projects to bring some touches of fall in to our home, and I'm having fun playing with different color combinations.
Today I have a fun art project tutorial for you! I created my art to specifically to tie together the fall color palette that I selected for our kitchen, but it can easily be adapted to fit any color scheme and style.
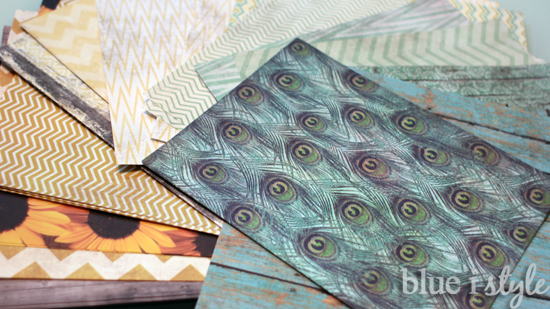
My
kitchen has teal walls and we have a few royal blue accents throughout the room, so the blue and green shades of peacock feathers seemed a natural fit for the space. To tie these colors together with a felling of autumn, I decided to add in some touches of golden yellow.
I decided to create a piece of artwork using all of these colors that could serve as the focal point for my fall kitchen decor.
Before I get to the tutorial, here's the complete supply list for this project:
- Stretched canvas (I used 16x20)
- Scrapbook paper in your choice of colors/patterns
- Paper cutter OR ruler and scissors
- Mod Podge
- Small paint brush
- Adhesive backed vinyl OR letter stickers
- Cricut or Silhouette cutter (OPTIONAL)
- Sand paper
- Spray paint
I started by scouring the scrapbook aisles of my favorite craft stores for papers in papers in shades of teal and gold. I even managed to find some gorgeous peacock feather paper at Michaels.
I used my paper cutter to measure and cut 4 half-inch wide strips from one page of each scrapbook paper pattern. {I sat the uncut portion of each paper aside for use in another project.}
Once all of my strips of paper were cut, I started to lay them out on my canvas. All of my papers were in shades of yellow/gold and teal, so I decided to have the start with the yellow tones on the left side of the canvas, and end with the teal shades on the right side.
Each strip of paper was only 12 inches long {except my peacock paper, which was only 11 inches long}. Since the canvas I purchased was 16 inches tall, I knew I would have to piece multiple strips of paper together to cover the entire canvas. As I laid out the strips across the top portion of the canvas, I made sure to only use 3 of the 4 strips in each pattern, and I sat the fourth strip of each to the side for use in filling in the bottom of the canvas.
Once I had laid out paper strips across the entire top of the canvas, and was happy with the arrangement, I pulled out my Mod Podge and a paint brush.
I used the Mod Podge as glue. Starting on the left side of the canvas, I picked up the strips of paper one by one, brushing the back with Mod Podge, then placing it back on the canvas and smoothing it down. I continued this way until all of the strips of paper were affixed to the canvas.
I then took the extra strips of paper {the ones I had sat aside a couple of steps above} and cut them into four inch pieces {the length needed to cover the bottom portion of the canvas}.
When gluing down these short strips, I matched them up with the strips on the top of the canvas as closely as possible. For the chevron patterned papers, it wasn't always possible to line them up just right, but I got close enough to make it look pretty good.
After all of the strips were glued to the canvas, I proceeded to put a sealer coat of Mod Podge over the entire paper covered canvas. The reason for this is that in the next steps I would be placing vinyl stickers on to the canvas, which I would later need to remove. I was concerned that the stickers might tear the paper when removed, so I used the Mod Podge as a sealer to protect the paper.
While the sealer coat of Mod Podge dried, I got out my Cricut and cut letters to spell out the phrase "Fall in Love" {my attempt at a cutesy play on words for the fall season}. I cut the letters from some white adhesive backed vinyl that I had left over from various past projects.
Next, I used my mom's Sizzix die cutting machine to cut three leaf shapes from the vinyl as well. {I really need to get my own so that I can quit borrowing my mom's!}
Once the Mod Podge sealer coat was dry, I pealed of the backing on my vinyl letter stickers and placed them on my canvas. I selected the placement of my letters to minimize the number of places that they overlapped the "seams" between the top and bottom strips of paper. As you can see in the photo, I ended up with only the "l" in "love" overlapping a seam.
With the stickers in place, I was ready to paint the canvas. I have heard this process referred to as "reverse stickering " The idea is that you paint the entire thing, then remove the stickers revealing the pattern below only in those areas that were covered.
But before I painted the canvas, I started to worry about how well the paint would stick to the somewhat glossy Mod Podge finish. I didn't want to have to use primer, so I instead grabbed a piece of fine grit sandpaper from the workbench, and lightly sanded the entire surface of the canvas. I was carefully not to press hard enough to sand through the sealer and scratch the paper, and I was carefully not to catch and peel up the edges of the stickers. I sanded the surface just enough to rough it up every so slightly, giving the paint a little something to grip.
I then carried the canvas outside and prepared to paint the entire thing in a shade of blue somewhere between royal and navy.
I worked slowly and in light coats until the entire canvas was covered.
As soon as the blue spray paint was dry, I brough my canvas inside and slowly started to peel off the vinyl stickers. I was releaved to see that the stickers had provide a good seal, stopping any paint from bleading under, and that the paint did not peel or tear as I removed the stickers.
As I removed the stickers, I started to get giddy about the awesome result! I just love the look of all those strips of patterned papers spelling out the words on my canvas!
With all of the stickers removed, I stood back to admire my work. My husband acted surprised at how much he liked the finished project. Apparantly he was doubting my plan as he watched me work on this art project. But the finished art canvas got his stamp of approval!
I have totally fallen in love with this easy work of art... BaDumChing {sorry... couldn't help it!}
I am so excited about the way this work of art ties together my fall color scheme of blue, teal and gold!
Be sure to come back next week when I'll be taking part in a fall home tour with a whole bunch of other, crazy talented bloggers.
If you are looking for even more seasonal inspiration, you might be interested in these fall and Halloween projects:
Labels: art, autumn, crafts, Cricut, decor, decorating, DIY, fall, paint, paper, seasonal, Sizzix