There's no telling what I might find in my purse on any given day. With two young kiddos, you'll likely always find a couple of diapers, some fruit snacks, pouches of apple sauce, a pacifier, and maybe a stray sock or two. The musts include my wallet and phone, my makeup bag, and my mini-expanding filer full of coupons and gift cards. Until recently, you were also likely to find bent or torn paint samples and tiny, fraying fabric swatches buried in the depths of my purse. But no longer! Decorating just got a whole lot easier {and more organized}.
It's a bit ridiculous how excited I am to share the customized paint and fabric swatch kit that I made, but it has seriously made decorating so much easier, and that makes me so happy!!
This all started months ago when I was organizing all of the paint in our utility room and making this customized paint deck.
I loved the idea of having a sample of each of our paint colors, and I use my popsicle-stick paint deck frequently when heading into the utility room to pick a paint color for a project around the house. But for decorating on the go {a.k.a. shopping} I knew that I also wanted to create a swatch kit that could include both paint and fabric samples. So while I was in the process of transferring all of our paint into new, organized containers, I took the opportunity to create paint swatches on card stock. I covered the kitchen counter in old advertisements {my kind of recycling} and then used blue painters tape to secure each piece of card stock down while painting. After removing the tape, I trimmed off the unpainted white area (I originally intended to leave this white strip at the top of each paint swatch, but the painters tape tore the paper no matter how carefully I removed it).
I then made notes on the back of each of the color swatches to indicate the brand and name of the paint, as well as the locations around our house where the paint has been used.
Once all of my paint swatches were complete, I moved on to fabric. Many of the pillows around our house are handmade, as are the quilts on our beds and the wall hanging quilt in the nursery {thanks, mom!}, so I have several bins full of the fabric remnants. I also have always asked for a fabric sample each time we purchase a piece of custom upholstered fabric (like our living room couch), but until now, those fabric samples have been tucked in a file in my office. I sorted through all of the fabrics that have been used in the decor of our house, and cut a swatch of each (the same size as my paint swatches) using pinking shears. Unfinished cloth edges easily fray, and while pinking shears don't actually prevent fraying, they do limit the length of frayed threads, minimizing damage.
Of course, there are store-bought pillows and furniture in our home for which I don't have extra fabric, but still wanted to find a way to include these in my swatch kit. My solution was to print a very similar color onto card stock - I used Photoshop, but you could just as easily do this using Word or any other program that allows you to create custom colors. This took a bit of trial and error, but if my first attempt was not a close enough color match, it was as simple as adjusting the color and hitting print again. Using this method, I was able to create a swatch to match the pink pillows in our living room and the burgundy chair in my office, among others.
Seeing all of the paint and fabric swatches from our home in one place makes two thing very clear - we have no fear of color and we especially love blues and grays!
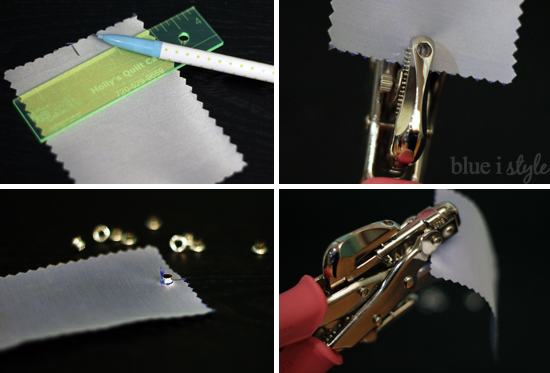
When determining how to assemble all of my swatches, my primary goals were durability and flexibility. I wanted to ensure that my paint swatches wouldn't get bent or torn, and that my fabric swatches wouldn't fray too much. I also wanted to be able to quickly and easily add or remove swatches as we change things around the house. To create maximum flexibility, I wanted to use a binder ring to hold all of the swatches together, but this meant that I needed to punch a hole in each swatch. I knew that the fabric would tear or fray without protection, so I opted to insert a metal eyelet through each hole to reinforce the fabric.
There are a few ways you can insert eyelets - either using a set of inexpensive eyelet setting tools that you can purchase at any craft or fabric store (like the tool set on the left), or you can use a multi-function tool like my Crop-a-Dile Eyelet and Snap Punch (on the right; made by We R Memory Keepers and available from Amazon for $17.50).
The Crop-a-Dile is one of my favorite craft tools because it is actually eight tools in one, including a hole punch and eyelet setter.
Based on the size of my eyelets, I determined that I needed to use the larger hole punch. I measured and marked the top center of each of my fabric swatches, then punched a hole, inserted and set an eyelet in each.
For a few of the fabric swatches, I noted important details on mailing labels, then stuck the labels to the back of the fabric. I knew that overtime, the labels would likely not continue to stick to the fabric, so I inserted the eyelet through both the fabric and the label to hold them together.
I had originally planned to also use the eyelets for the paint swatches as well, but after stacking up all of the fabric swatches, I realized that the eyelets added quite a bit of thickness to each. If I had also added eyelets to all of the paint swatches, the stack would have quickly become too thick, so I instead opted to simply use reinforcement labels around the holes in the paint swatches to prevent them from tearing.
You all know I love to organize, so of course I had to create divider tabs to organize all of my swatches. I printed the divider tabs on the computer (one for each room of the house), and cut the tabs to be the same width as the swatches, but about half and inch longer. I punched holes in these divider tabs and again added reinforcement labels.
Finally, I created a front and back cover for my swatch kit. Since durability was one of my main concerns, I selected medium weight chipboard for the covers {thick enough not to bend easily, but thin enough for me to set eyelets}. I made the front and back covers just a bit wider and longer than the swatches and divider tabs so that everything would be safely tucked inside where they wouldn't get bent or torn. I designed a pretty cover in Photoshop, printed it on card stock, placed it on top of the chipboard, and then used mod podge to give the front and back covers a protective coating.
It was time to assemble all of my swatches on the binder ring that I had purchased. I was so excited to see the finished product, but...FAIL. It turned out that my stack of swatches was just a bit too thick to hang nicely from my two-inch binder ring. I went to three stores looking for a three-inch binder ring, but couldn't find one in stock. So I turned to my friend Amazon to save the day, and ended up finding an even better option. Rather than buying a larger, metal binder ring which would have been a bit big and bulky in my purse, I found a two inch flexible "manta ring" with a screw closure that I knew would work perfectly.
Even though the diameter is no larger than my original binder ring, the flexibility of the manta ring made everything hang very nicely {and I got it in pretty blue - so you can't beat that}.
I just LOVE the finished product! It's so functional and pretty, and it will be so easy to update. All I have to do is open the ring to add or remove swatches as our decorating evolves.
It's nice having all of my swatches in one convenient kit that I can easily take with me when I am shopping. Now I'll no longer have to debate on whether to buy a vase because I'm not sure if it will compliment our pink accent pillows, or whether the color in a rug will work with the teal of our living room walls.
Just this past weekend, I took the swatch kit with me while choosing paint colors for Beckett's new room. I was able to flip to the section of the kit that contains all of the fabrics we are using , which made deciding on the right paint colors so much easier! My swatch kit also got a lot of questions and compliements from other shoppers!
This swatch kit seriously makes me smile...and it makes me want to go shopping more often, which might be an unfortunate side effect. But at least I have a cute shopping companion!
I love this swatch kit so much that I decided to take one more step to protect it. The chipboard covers are great, but I realized that the swatches and divider tabs could still easily swing from side to side, allowing them to get bent or torn (especially inside my purse). To solve this problem, I picked up a large, black and white polka dot rubber band (intended for file folders and books) and wrapped it around the base of the swatch kit to hold everything together.
Now I can toss my swatch kit in my purse when I am on the go without fear that it will be damaged. That means it will survive to see many, many more decorating projects! Bring it on!
Labels: decorating, fabric, organization, organizing, paint