When we bought our house five years ago, the basement was already finished. On the upside, it's definitely a nice perk to have a fully finished space that greatly adds to the livable square footage of our house, however, on the downside, that means that there is almost no storage space in the basement.{Although the basement does have an elevator closet - "what's that?" you ask. You can read about one here}.
Our utility room in the basement is very small, and thanks to some pipes running floor to ceiling in the middle of the space, there is very little room for any kind of storage... or so we thought.
A couple of years ago we bought a narrow shelf unit for the corner of the utility room. But despite the fact that dimensions were small enough to fit behind the pipes, it turned out that the shelf unit wouldn't work because the floor is not level. The shelf unit had adjustable feet to accommodate uneven surfaces, but the floor in the utility room slopes too drastically toward the drain in the middle of the room, so even the adjustable feet were not enough to make the shelf unit work in the space.
For a while we were resolved to the fact that our tiny utility room couldn't effectively be used for storage. Then it occurred to us that while the unlevel floor meant we couldn't have a free standing shelving unit, we had no shortage of studs to which we could attach shelf brackets.
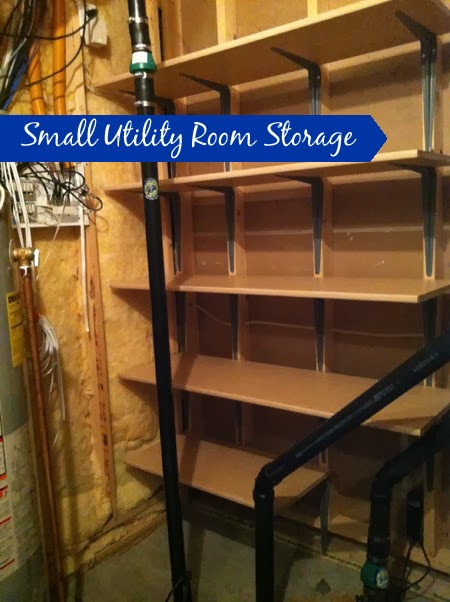
Since we wanted the utility room shelves to be strong enough to hold heavy items, such as paint cans, we purchased heavy duty metal shelf brackets, and opted for thick composite shelf boards that we had cut to length at Home Depot. To ensure that the shelves were secure, Scott also secured the brackets to the underside of the shelves with short screws.
As you can see, Scott was working in pretty tight quarters while installing these shelves.
And when it came to screwing the very bottom shelf in place, he had to call me in for the back corner since I could more easily squat down between the water heater and the shelves without stepping on the fragile, plastic sump pump cover.
The best part of this shelving solution is that we were able to customize it to take advantage of every available inch. The shelves we installed span the full available width between the wall and the pipes, including a shorter bottom shelf that fits in the tightest of spaces.
This may not be the most stylish shelving you've ever seen, but it sure does add a lot of functionality to a previously unused and unusable corner of our home. We'll be organizing a number of things in this new found storage space, including all of our latex paint and paint supplies. I'll be back soon with more details on our paint storage solutions.
UPDATE: Click here to see the final reveal of these shelves filled up with all of our paint and painting supplies! For details on how and why we transferred all of our latex paint into screw-top canisters click here. And for details on how we created a customized paint deck, used paint reference charts to document the details of our paints, and created a kit to making paint organization quick and easy, click here!
Labels: closet, DIY, home improvement, organization, shelving, storage