Just before Cooper was born, I finally started working on one of the nursery projects that never got completed before Beckett arrived a year and a half earlier. I was determined to finally get the window coverings for the nursery finished before Cooper's arrival. Well, perhaps I was a bit too ambitious about how much I could get done while 9 months pregnant because after I painted the cornice boards with zebra stripes to tie in with the zebra rug in the nursery, I ran out of both time and energy, and the cornice boards didn't get installed. But now, nearly three months later, I'm happy to report that the project is finally, FINALLY complete! So I'm back to share Part 2 of my zebra striped cornice board story - the installation process. {click here to read Part 1}
A cornice board, by definition, is built as a shallow box that sits out in front of the window, but since our windows are deeply inset, we decide to mount our boards flush with the wall instead. For the narrow window, Scott started by screwing two L-brackets to the top of the window frame. Because the L-brackets would ultimately be hidden by the boards, he simply eyeballed the placement of the brackets from left to right, rather than measuring. The only important aspect of the bracket placement was that the "L" be flush with the vertical wall.
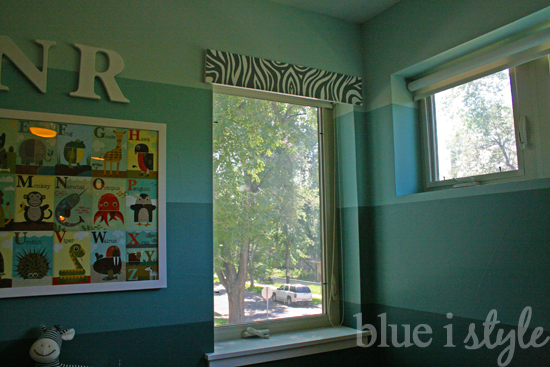
Then he held up the cornice boards to determine how we wanted to position them. We wanted to ensure that the boards would hide the solar shade roll, but because the horizontal window is so long and thin, we also wanted to be careful that the six inch high cornice did not cover up too much of the window opening (thus making the window look even narrow). We ultimately decided to position the boards an inch and a half above the top of the window. And, of course, we also ensured that the boards were centered from left to right.
After measuring to ensure that the first cornice board was centered and level, I used a pencil to mark where the holes of the L-bracket lined up with the board while Scott held it in place. The first time we did this, we were holding the board upside down, so you'll see that we had to erase the first set of pencil marks and try again (I'm just glad we realized before drilling the holes). Granted, only I would know that my zebra stripes were "upside down," but I am anal and that is why Scott loves me, right?!

The inside of the window frames are not totally level, so it was necessary to install the L-brackets to the window frame first. If we had instead installed the L-brackets on the cornice board based on measurements alone, we would have run the risk that the bracket would not sit flush on the horizontal surface of the window inset. However, while installing them on the window frame first solved one problem, it created another - there was not enough space to fit a drill or screw driver into the window inset to insert the screws through the L-brackets into the back of the cornice board. This meant that after we used the pencil to mark the location of the L-bracket holes on the cornice board, Scott had to remove the L-brackets from the window frame. Then, he drilled pilot holes in the cornice board and installed the L-brackets directly onto the board. Since the cornice board is just under an inch deep, Scott was careful not to drill the pilot holes all the way through the board. In addition, we were careful to select screws that were short enough that they would not poke through the front of the board once fully screwed in.


With the L-brackets installed on the board, Scott lined up the holes in the L-brackets with the holes he previously drilled in the window frame and re-inserted the screws to complete the installation of the first cornice board. While this method involved an extra step, it ensured that the L-brackets sit flush inside of the window frame and that the cornice board is level.
For the shorter of the two cornice boards, two L-brackets were sufficient to hold it securely in place. For the longer window, we followed the same installation process, but used five L-brackets spaced along the length of the window.
Now that both cornice boards are in place, the only thing left is to hang the drapes in the vertical window. I'll be back tomorrow with photos of the drapes as soon as I figure out what type of tie-back I want to use.
 |
| {sorry for the poor photo quality - it's hard to photograph directly into the light} |
After struggling to figure out how to address the long, thin horizontal window that is not well suited to drapes, the cornice boards seem to be the perfect solution to allow us to add drapes to the vertical window while still tying together the look of both windows.
Does anyone else out there have long, thin horizontal windows? I'd love to hear how you have addressed these windows, as we have many more throughout our house that still need some attention.
Update: Check out these links for all of the posts about the nursery, including the drapes that I paired with these cornice boards...
Labels: baby, gender neutral, interior design, kids, nursery, stripes, window coverings, windows